
Author Name: Dr. Sandra Thompson
Common Symptoms: Tooth Sensitivity, Pain, Visible Spots
Most children won’t be able to articulate that they have a cavity, but there are subtle cues parents can watch for. If your child complains about pain while eating sweets or drinking something hot or cold, this could indicate tooth sensitivity—a sign of enamel breakdown. You might also notice them avoiding chewing on one side of their mouth. In some cases, visible white spots or brown discoloration can appear on the surface of the tooth, signaling the start of decay.
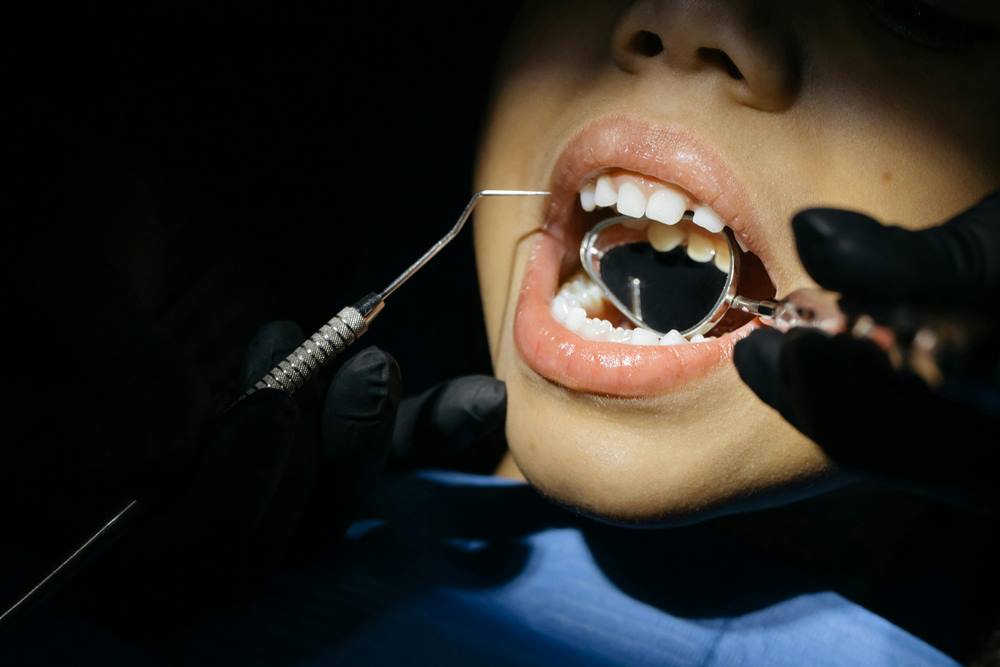
How a Pediatric Dentist Diagnoses Cavities
When you take your child to a pediatric dentist, the process begins with a thorough examination. Using child-friendly tools and techniques, the dentist will visually inspect the teeth for surface damage and may use a small mirror to check hard-to-see areas. Depending on your child’s age and comfort level, the dentist might also recommend dental X-rays to assess the extent of decay below the surface. Pediatric dentists are specially trained to keep children calm and cooperative during this diagnostic stage.
Importance of Early Detection to Prevent Further Decay
Catching a cavity early is key to avoiding more invasive dental procedures down the road. Small cavities can often be treated with simple fillings and minimal discomfort. However, when cavities go untreated, they can progress to infect the inner pulp of the tooth, leading to pain, infection, and even the need for extraction. By bringing your child to a pediatric dentist at the first sign of discomfort—or better yet, during routine checkups—you ensure issues are addressed early.
Explaining the Visit in Age-Appropriate Language
The way you talk to your child about the upcoming visit matters. Use simple, reassuring language to describe what will happen. Instead of saying “The dentist will drill your tooth,” try phrases like, “The dentist is going to clean the sugar bugs out of your tooth and make it strong again.” Avoid using words like “pain,” “needle,” or “shot,” which can increase fear. Pediatric dentists often use a “tell-show-do” approach, which means they’ll explain and demonstrate tools gently before using them—so you can align your wording with that supportive method.
Tips to Reduce Anxiety Before Seeing the Pediatric Dentist
Start preparing a day or two before the appointment. Read children’s books or watch short videos about visiting the dentist, especially those featuring favorite characters. Role-playing a pretend dentist visit at home can also help normalize the experience. If your child tends to be nervous, schedule the appointment for earlier in the day when they’re well-rested. Keep your tone calm and positive; children often mirror your emotions. You can even let your child bring a favorite stuffed animal or comfort item to hold during the visit.
What to Bring and How to Make the Experience Smoother
Arrive a few minutes early to allow your child to acclimate to the environment. Bring any medical or dental history, insurance information, and a list of questions you might have. If your child has allergies, sensitivities, or past negative experiences with dental visits, let the dental team know in advance. Some pediatric dentists allow the child to wear headphones or watch cartoons during treatment to help them relax.
Numbing the Area (If Needed)
For most children, especially those with deeper cavities, the pediatric dentist will begin by numbing the area around the tooth to prevent discomfort. A flavored topical gel is often applied first to numb the surface of the gums. If necessary, a small amount of local anesthesia may be injected using a fine needle—though many pediatric dentists use distraction techniques or tools like the Solea Laser to minimize or eliminate the need for needles altogether. The numbing process usually takes a few minutes and ensures your child feels little to no pain during the procedure.
Removing Decay and Cleaning the Cavity
Once the area is numb, the dentist carefully removes the decayed portion of the tooth using small, quiet instruments or advanced laser technology. This step is essential to stop the spread of decay and protect the healthy part of the tooth. Pediatric dentists take extra care to work gently and precisely, explaining what’s happening in friendly, non-threatening terms to keep your child comfortable.
Filling the Tooth with a Child-Safe Material
After the cavity is cleaned and disinfected, the empty space is filled with a child-safe material, usually tooth-colored composite resin. This material is strong, blends in with your child’s natural tooth, and helps restore proper function. The dentist shapes and polishes the filling so it fits comfortably and doesn’t interfere with your child’s bite. In some cases, a silver-colored amalgam may be used—especially for back molars that need extra durability.
Duration and What Your Child May Feel
The entire cavity treatment typically takes between 30 to 60 minutes, depending on the severity of the decay and the number of cavities being treated. Most children feel minimal discomfort during the procedure, especially with numbing or laser alternatives. They might feel a little pressure, hear some buzzing sounds, or experience mild tingling, but pain is rare.
What to Expect After the Filling (e.g., Numbness, Sensitivity)
It’s completely normal for your child to experience some numbness in the lips, cheeks, and tongue for a few hours after the procedure—especially if local anesthesia was used. During this time, they might accidentally bite their cheek or have difficulty speaking clearly. Make sure to monitor your child and remind them not to chew, suck, or poke the numb area with their fingers or tongue.
Mild tooth sensitivity to hot, cold, or pressure can also occur for a day or two, particularly if the filling was deep. This usually subsides on its own as the tooth adjusts.
Food and Drink Guidelines for the First Few Hours
Until the numbness fully wears off (usually 1–3 hours), it’s best to avoid eating to prevent accidental biting of the tongue or cheek. Once your child is ready to eat, start with soft foods like applesauce, yogurt, soup, or mashed potatoes. Avoid anything too hot, crunchy, chewy, or sticky on the day of the procedure, as these can irritate the treated area or dislodge a fresh filling.
Encourage your child to drink plenty of water, but skip carbonated beverages and sugary juices immediately after treatment.
Pain Management, If Necessary
Most children experience little to no pain after a filling. However, if your child is uncomfortable, over-the-counter pain relievers like children’s acetaminophen or ibuprofen (as directed by your pediatrician or dentist) can help. Avoid giving aspirin to children due to the risk of Reye’s syndrome.